Go Micro is a framework for microservices development. It’s built on a powerful pluggable architecture using Go interfaces. Go Micro defines the foundations for distributed systems development which includes service discovery, client/server rpc and pubsub. Additionally Go Micro contains other primitives such as auth, caching and storage. All of this is encapsulated in a high level service interface.
This is the multi-page printable view of this section. Click here to print.
Overview
Go Micro is a framework for microservices development
- 1: Getting Started
- 2: AI Integration
- 3: MCP & AI Agents
- 4: Deploying Go Micro Services
- 5: Architecture
- 6: Configuration
- 7: Observability
- 8: Hosting Go Micro Services
- 9: Performance Considerations
1 - Getting Started
Go Micro has three core abstractions:
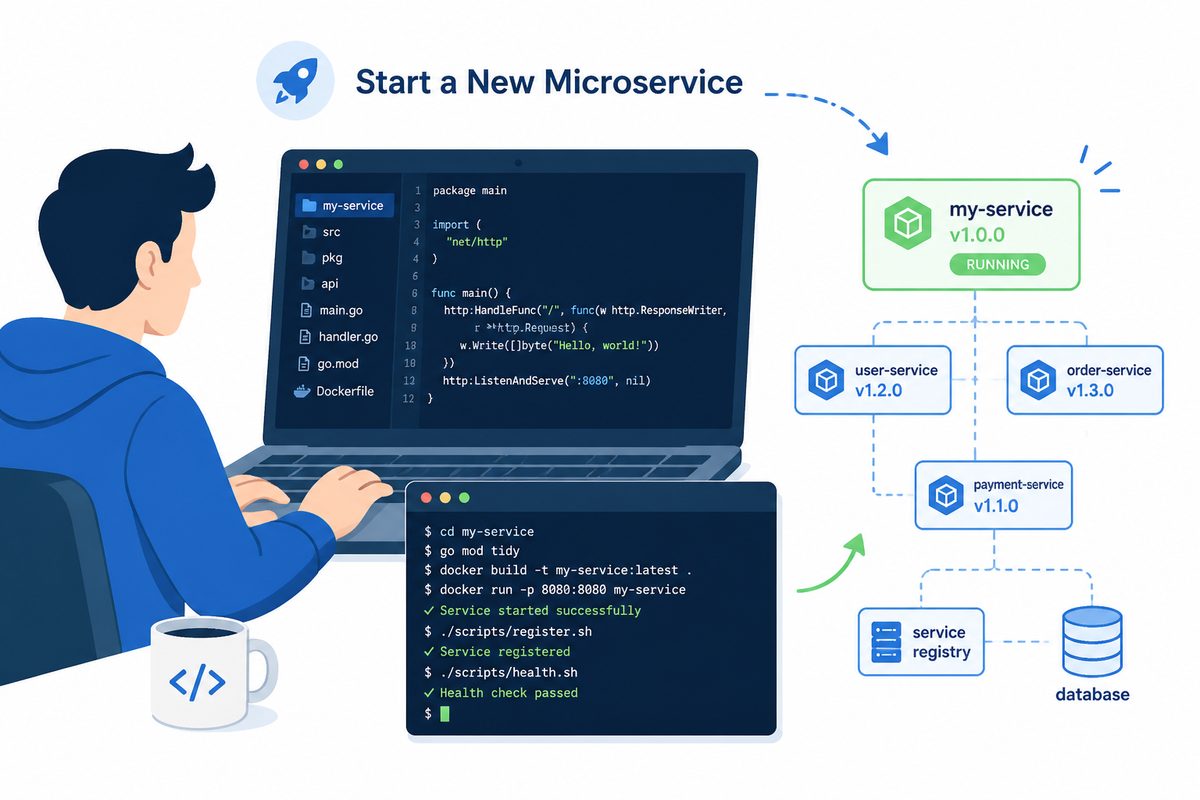
Go Micro has three core abstractions:
| Abstraction | What | Constructor |
|---|---|---|
| Service | Capability — endpoints, data, business logic | micro.NewService("task") |
| Agent | Intelligence — manages services with an LLM | micro.NewAgent("task-mgr") |
| Flow | Orchestration — event-driven LLM triggers | micro.NewFlow("onboard") |
Prerequisites
- Go 1.24+ for development. The
curlinstall below gives you themicrobinary without Go, butmicro runcompiles your services, so you’ll want Go installed to build them. - An LLM provider key (Anthropic, OpenAI, Gemini, …) only for the AI features —
micro run --prompt,micro chat, and agents. Plain services need no key. Set it before running, e.g.export ANTHROPIC_API_KEY=sk-ant-....
Before your first provider-backed agent run, check the local path with:
micro agent preflight
The preflight is read-only: it verifies Go 1.24+, the micro binary, provider-key setup, and whether the default micro run gateway port is free, without calling an LLM provider. When a check fails it prints the exact fix plus the next guide to open, so the scaffold → run → chat path stays walkable.
Install
# Binary (no Go required)
curl -fsSL https://go-micro.dev/install.sh | sh

# Or with Go
go install go-micro.dev/v6/cmd/micro@latest
Quick Start: Generate from a Prompt
Prefer to start from a runnable reference? Clone the repository and run the maintained support-desk lifecycle example first:
git clone --depth 1 https://github.com/micro/go-micro.git
cd go-micro
go run ./examples/support
That example is the no-secret 0→hero path: services expose ticket/customer/notification tools, an agent handles the work, and an event-driven flow triggers the agent. See Learn by Example when you want more runnable starting points.
Describe what you need. The AI designs services, writes handlers, compiles, and starts them:
micro run --prompt "task management system"
You’ll see the design, confirm, and services + agent start:
Services:
  ● task — Core task management
  ● project — Project organization

Generate? [Y/n]

Micro
  Services:
    ● task
    ● project
  Agents:
    ◆ agent
The interactive console lets you talk to your services immediately:
> Create a project called Launch, then add a task called 'Write docs'

→ project_Project_Create({"name":"Launch"})
← {"record":{"id":"p1..."},"success":true}
→ task_Task_Create({"title":"Write docs","project_id":"p1..."})

Created project Launch and added task 'Write docs' to it.
The console discovers services from the registry and orchestrates across them via the agent. Use micro run -d for detached mode without the console, or micro chat as a standalone command.
If the agent surprises you while iterating, use the Debugging your agent guide to inspect service registration, tool calls, run history, memory, provider failures, and flow handoffs.
When you are ready to prove the whole path end to end, follow the 0→hero reference path. It is the canonical handoff from this quick start: scaffold a service, run it locally, chat with an agent, inspect durable agent/flow history, and finish with micro deploy --dry-run using the same commands exercised by make harness.
Quick Start: Write a Service
Create and run a service manually:
micro new helloworld
cd helloworld
micro run
Open http://localhost:8080 to see the dashboard, call endpoints, and chat with your service.
A service is a Go struct with methods. Doc comments and @example tags become tool descriptions for AI agents:
package main

import (
    "context"

    "go-micro.dev/v6"
)

type Request struct {
    Name string `json:"name"`
}

type Response struct {
    Message string `json:"message"`
}

type Say struct{}

// Hello greets a person by name.
// @example {"name": "Alice"}
func (h *Say) Hello(ctx context.Context, req *Request, rsp *Response) error {
    rsp.Message = "Hello " + req.Name
    return nil
}

func main() {
    service := micro.NewService("greeter")
    service.Handle(new(Say))
    service.Run()
}
micro run gives you:
- Dashboard at
http://localhost:8080 - API Gateway at
http://localhost:8080/api/{service}/{method} - Agent Playground at
http://localhost:8080/agent - MCP Tools at
http://localhost:8080/mcp/tools - Hot Reload — auto-rebuild on file changes
micro new scaffolds a reflection-based service by default — plain Go types, no code generation, so go run . works with nothing else installed. If you prefer Protocol Buffers, add --proto (this requires the protoc toolchain; the command tells you what to install).
Templates are available for common patterns. These use Protocol Buffers, so they need the protoc toolchain (protoc, protoc-gen-go, protoc-gen-micro — micro new prints the install commands if they’re missing):
micro new contacts --template crud
micro new events --template pubsub
micro new gateway --template api
Building Agents
For a complete service-backed walkthrough, start with Your First Agent. If you want to run before you write, use examples/support for the full services → agents → workflows lifecycle or examples/agent-plan-delegate for the smallest multi-agent planning/delegation path.
An Agent is an intelligent layer that manages one or more services:
package main

import "go-micro.dev/v6"

func main() {
    agent := micro.NewAgent("task-mgr",
        micro.AgentServices("task", "project"),
        micro.AgentPrompt("You manage tasks and projects. You understand deadlines, priorities, and assignments."),
        micro.AgentProvider("anthropic"),
        micro.AgentAPIKey("sk-ant-..."),
    )
    agent.Run()
}
An agent is a service — it has a proto-defined Agent.Chat RPC endpoint and registers in the registry like everything else. It:
- Discovers its services from the registry
- Only sees endpoints from its assigned services (scoped tools)
- Maintains conversation memory in the store (persists across restarts)
- Is callable via
micro call, the interactive console, or any go-micro client
Use it programmatically:
resp, _ := agent.Ask(ctx, "What tasks are overdue for Alice?")
fmt.Println(resp.Reply)
Or via the CLI:
micro agent list                    # list registered agents
micro call task-mgr Agent.Chat '{"message": "What tasks are overdue?"}'
When multiple agents are registered, the console routes to the right agent automatically.
Event-Driven Flows
A Flow subscribes to a broker topic and triggers an LLM when events arrive. You can define flows in code or run them from the CLI.
In code:
f := micro.NewFlow("onboard-user",
    micro.FlowTrigger("events.user.created"),
    micro.FlowPrompt("New user created: {{.Data}}. Send welcome email and create workspace."),
    micro.FlowProvider("anthropic"),
    micro.FlowAPIKey(os.Getenv("MICRO_AI_API_KEY")),
)
f.Register(service.Options().Registry, service.Options().Broker, service.Client())
From the CLI:
micro flow run --trigger events.user.created --prompt "New user: {{.Data}}. Send welcome email."
micro flow exec --prompt "Summarize all open tickets and email the report."
The flow discovers all services as tools and lets the LLM decide which RPCs to call in response to the event.
CLI Workflow
| Command | Purpose |
|---|---|
micro run --prompt "..." | Generate services + agent, start with interactive console |
micro run | Dev mode: hot reload, gateway, interactive console |
micro run -d | Detached mode (no console) |
micro chat | Standalone chat (when not using micro run) |
micro agent list | List registered agents |
micro flow run --trigger <topic> | Run an event-driven flow |
micro flow exec --prompt "..." | Execute a one-shot flow |
micro new myservice | Scaffold a service |
micro call service endpoint '{}' | Call a service or agent |
micro build | Compile production binaries |
micro deploy user@server | Deploy via SSH + systemd |
Next Steps
- Learn by Example — runnable examples mapped to services, agents, and workflows
- 0→hero Reference — the maintained no-secret lifecycle contract
- AI Integration — how services, agents, MCP, and LLMs fit together
- Agent Design — the full agent interface specification
- MCP & AI Agents — MCP gateway, tool discovery, and auth
- Data Model — typed persistence with CRUD and queries
- Deployment — deploy via SSH + systemd
2 - AI Integration
Go Micro is an AI-native microservices framework. Every service you build is automatically accessible to AI agents, and every service can call AI models. This page explains how the pieces fit together
Go Micro is an AI-native microservices framework. Every service you build is automatically accessible to AI agents, and every service can call AI models. This page explains how the pieces fit together.
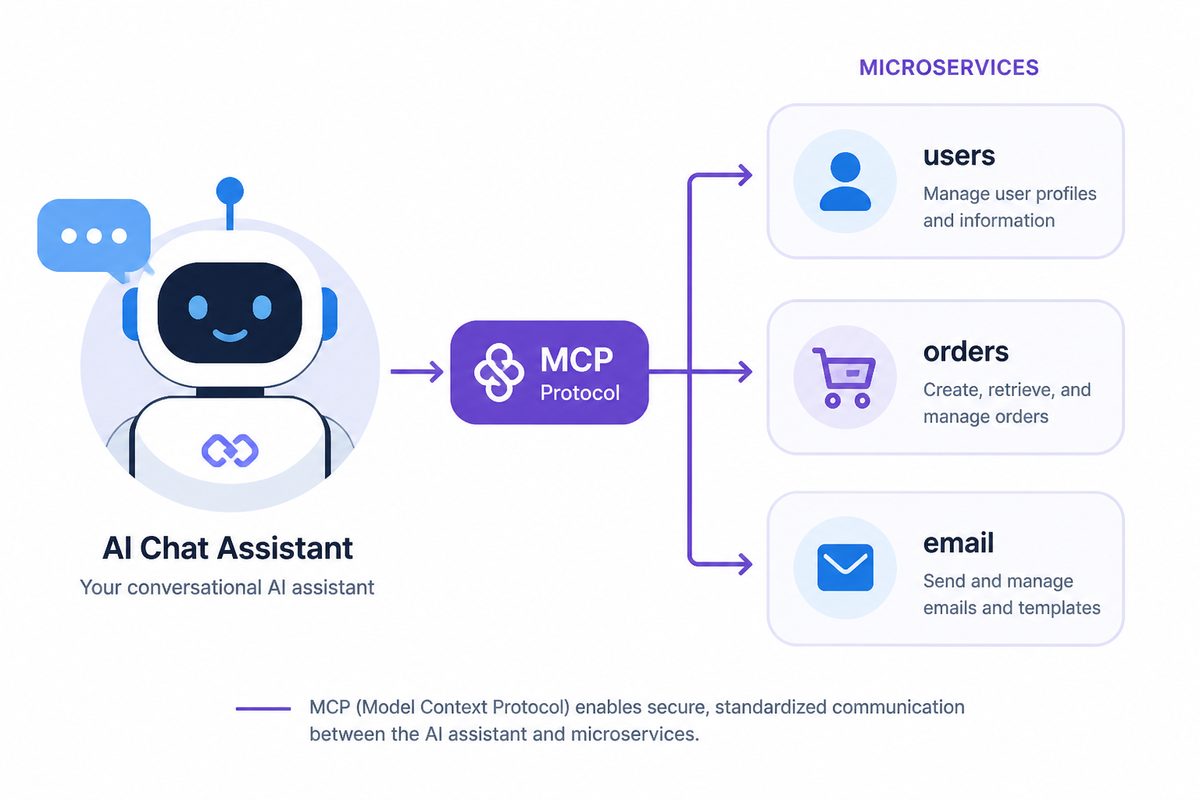
The Stack
Your Services           →  write Go handlers, register with the framework
    ↓
Registry                →  automatic service discovery (mDNS, Consul, etcd)
    ↓
Gateways                →  micro api (HTTP→RPC) / micro mcp (MCP tools)
    ↓
ai.Tools                →  discovers services + executes RPCs programmatically
    ↓
ai.Model                →  calls LLMs (Anthropic, OpenAI, Gemini, Atlas Cloud, ...)
    ↓
agent / flow / micro chat  →  agent-managed, event-driven, or interactive orchestration
Every layer is optional. You can use go-micro without AI. You can use the ai package without MCP. But when you stack them, you get services that AI agents can discover and orchestrate automatically.
Layer by Layer
1. Services (your code)
Write normal Go handlers. Add doc comments for AI tool descriptions:
// CreateUser creates a new user account.
// @example {"name": "Alice", "email": "alice@example.com"}
func (h *Users) CreateUser(ctx context.Context, req *pb.CreateRequest, rsp *pb.CreateResponse) error {
    // your business logic
}
The doc comment becomes the tool description. The @example tag gives the LLM a usage hint. No AI-specific code in your handler.
2. Registry (service discovery)
Services register automatically. The registry is the source of truth for what’s running:
service := micro.NewService("users")
service.Handle(handler.New())
service.Run() // registers with the registry
Pluggable: mDNS (default, zero config), Consul, etcd, NATS.
3. MCP Gateway (services → tools)
The MCP gateway walks the registry and exposes every endpoint as a tool via the Model Context Protocol:
// One line to expose all services as AI tools
service := micro.NewService("myservice", mcp.WithMCP(":3001"))
Or run it standalone:
micro mcp serve              # stdio for Claude Code
micro mcp serve --address :3000  # HTTP for web agents
Any MCP-compatible agent (Claude Code, ChatGPT, custom agents) can discover and call your services.
4. ai.Tools (discover + execute)
ai.Tools turns registered services into LLM-callable tools — discovery plus RPC execution in one type:
tools := ai.NewTools(service.Registry())
discovered, _ := tools.Discover()  // []ai.Tool from all registered services

// Wire execution into a model with one option:
m := ai.New("anthropic", ai.WithAPIKey(key), ai.WithTools(tools))
This is what powers micro chat and the agent playground. You can use it directly in your own services to build agentic workflows.
5. ai.Model (LLM providers)
The ai package provides a pluggable interface for calling LLMs:
import (
    "go-micro.dev/v6/ai"
    _ "go-micro.dev/v6/ai/anthropic"
)

m := ai.New("anthropic", ai.WithAPIKey(key))
resp, _ := m.Generate(ctx, &ai.Request{
    Prompt: "What users are in the system?",
    Tools:  discovered,  // from ai.Tools
})
Seven text providers, two image providers, one video provider. Same interface, swap with an import.
| Provider | Text | Image | Video |
|---|---|---|---|
| Anthropic | yes | ||
| OpenAI | yes | yes | |
| Google Gemini | yes | ||
| Atlas Cloud | yes | yes | yes |
| Groq | yes | ||
| Mistral | yes | ||
| Together AI | yes |
6. micro chat (orchestration)
The CLI ties it all together — discovers services, builds the tool list, and lets you talk to your services:
ANTHROPIC_API_KEY=sk-ant-... micro chat --provider anthropic
> list all users
> send a welcome email to alice@example.com
> create an order for product-42
Multi-turn conversation with ai.History — the model remembers context across turns. Type reset to clear history.
7. micro flow (event-driven orchestration)
Subscribe to broker events and let an LLM orchestrate the response:
import "go-micro.dev/v6/flow"

f := flow.New("onboard",
    flow.Trigger("events.user.created"),
    flow.Prompt("New user: {{.Data}}. Send welcome email and create workspace."),
    flow.Provider("anthropic"),
    flow.APIKey(key),
)
f.Register(service.Registry(), service.Options().Broker, service.Client())
Or from the CLI:
micro flow run --trigger events.user.created \
  --prompt "New user: {{.Data}}. Send welcome email." \
  --provider anthropic

micro flow exec --prompt "List all users" --provider anthropic
8. micro api (HTTP gateway)
A standalone HTTP-to-RPC gateway for exposing services over HTTP without the full dashboard:
micro api                    # listen on :8080
micro api --address :3000    # custom port

# Call services through the gateway
curl -XPOST -d '{"name":"Alice"}' http://localhost:8080/greeter/Greeter.Hello
What You Don’t Need
- No agent framework — the building blocks compose; you don’t need a LangChain or CrewAI equivalent
- No special handler code — your services are normal Go handlers with doc comments
- No API key to use MCP — external agents bring their own models; your services just expose tools
- No vendor lock-in — every provider implements the same interface; swap with one import
Getting Started
The fastest path:
# Create a service with MCP enabled
micro new myservice --template crud
cd myservice

# Run it
micro run

# Chat with it
ANTHROPIC_API_KEY=sk-ant-... micro chat --provider anthropic
> list all records
See also:
- MCP Documentation — detailed MCP gateway guide
- Atlas Cloud Integration — using Atlas Cloud as a provider
- AI Provider Guide — adding new providers
- gRPC Interop Example — calling go-micro from standard gRPC clients
3 - MCP & AI Agents
Go Micro provides built-in support for the Model Context Protocol (MCP), enabling AI agents like Claude to discover and interact with your microservices as tools.
Model Context Protocol (MCP)
Go Micro provides built-in support for the Model Context Protocol (MCP), enabling AI agents like Claude to discover and interact with your microservices as tools.
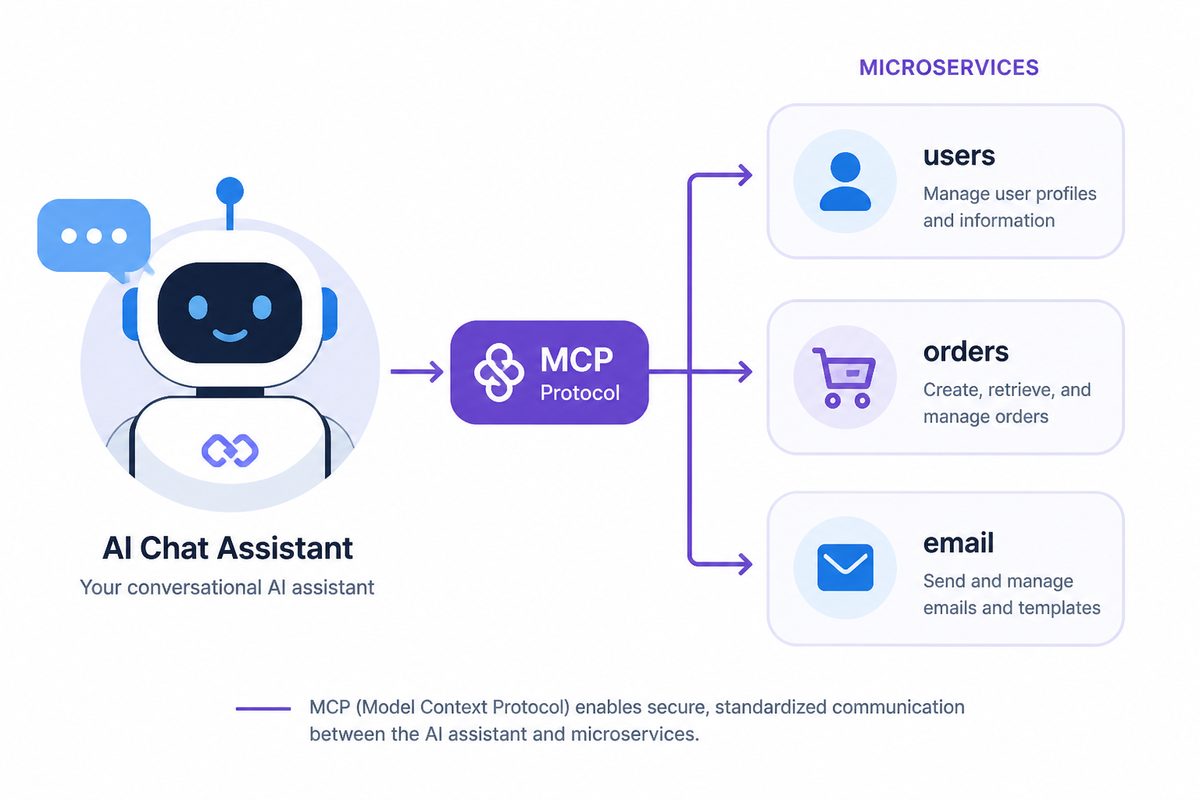
Overview
MCP gateway automatically exposes your microservices as AI-accessible tools through:
- Automatic service discovery via the registry
- Dynamic tool generation from service endpoints
- Stdio transport for local AI tools (Claude Code, etc.)
- HTTP/SSE transport for web-based agents
- Automatic documentation extraction from Go comments
Quick Start
1. Add Documentation to Your Service
Simply write Go doc comments on your handler methods:
package main

import (
    "context"
    "go-micro.dev/v6"
)

type GreeterService struct{}

// SayHello greets a person by name. Returns a friendly greeting message.
//
// @example {"name": "Alice"}
func (g *GreeterService) SayHello(ctx context.Context, req *HelloRequest, rsp *HelloResponse) error {
    rsp.Message = "Hello " + req.Name
    return nil
}

type HelloRequest struct {
    Name string `json:"name" description:"Person's name to greet"`
}

type HelloResponse struct {
    Message string `json:"message" description:"Greeting message"`
}

func main() {
    service := micro.NewService("greeter")
    service.Init()

    // Register handler - docs extracted automatically from comments!
    service.Handle(new(GreeterService))

    service.Run()
}
That’s it! Documentation is automatically extracted from your Go comments.
2. Start the MCP Server
Option A: Stdio Transport (for Claude Code)
# Start your service
go run main.go

# In another terminal, start MCP server with stdio
micro mcp serve
Add to Claude Code config (`~/.claude/claude_desktop_config.json`):
{
  "mcpServers": {
    "go-micro": {
      "command": "micro",
      "args": ["mcp", "serve"]
    }
  }
}
Option B: HTTP Transport (for web agents)
Start MCP gateway with HTTP/SSE:
micro mcp serve --address :3000
Access tools at `http://localhost:3000/mcp/tools`
3. Use Your Service with AI
Claude can now discover and call your service:
User: "Say hello to Bob using the greeter service"

Claude: [calls greeter.GreeterService.SayHello with {"name": "Bob"}]
       "Hello Bob"
Features
Automatic Documentation Extraction
Go Micro automatically extracts documentation from your handler method comments at registration time. No extra code needed!
For complete documentation details, see the gateway/mcp package documentation.
Authentication & Scopes for MCP Tools
MCP tool calls go through the same authentication and scope enforcement as regular API calls. This means you can control which tokens (and therefore which users, services, or AI agents) can invoke which tools.
Restricting MCP Tool Access
Set endpoint scopes — Visit
/auth/scopesand set required scopes on service endpoints. For example, setinternalonbilling.Billing.Chargeto restrict it.Create scoped tokens — Visit
/auth/tokensand create tokens with specific scopes:- A token with scope
internalcan call endpoints requiringinternal - A token with scope
*has unrestricted access (admin) - A token with no matching scope gets
403 Forbidden
- A token with scope
Use the token — Pass it in the
Authorizationheader for API/MCP calls:
# List available MCP tools (requires valid token)
curl http://localhost:8080/mcp/tools \
  -H "Authorization: Bearer <token>"

# Call a specific tool (scope-checked)
curl -X POST http://localhost:8080/mcp/call \
  -H "Authorization: Bearer <token>" \
  -d '{"tool":"greeter.GreeterService.SayHello","input":{"name":"World"}}'
Common MCP Token Patterns
| Use Case | Token Scopes | What It Can Do |
|---|---|---|
| Internal tooling | internal | Call endpoints tagged with internal scope |
| Production AI agent | greeter, users | Only call greeter and user service endpoints |
| Admin / debugging | * | Full access to all tools |
| Read-only agent | readonly | Call endpoints tagged with readonly scope |
Agent Playground
The agent playground at /agent uses the logged-in user’s session token. Scope checks apply based on the scopes of the user’s account. The default admin user has * scope (full access).
MCP Command Line
The `micro mcp` command provides tools for working with MCP:
# Start MCP server (stdio by default)
micro mcp serve

# Start with HTTP transport
micro mcp serve --address :3000

# List available tools
micro mcp list

# Test a specific tool
micro mcp test greeter.GreeterService.SayHello
Transport Options
- Stdio - For local AI tools (Claude Code, recommended)
- HTTP/SSE - For web-based agents
See examples for complete usage.
Examples
See `examples/mcp/documented` for a complete working example.
Learn More
4 - Deploying Go Micro Services
This guide covers deploying go-micro services to a Linux server using systemd.
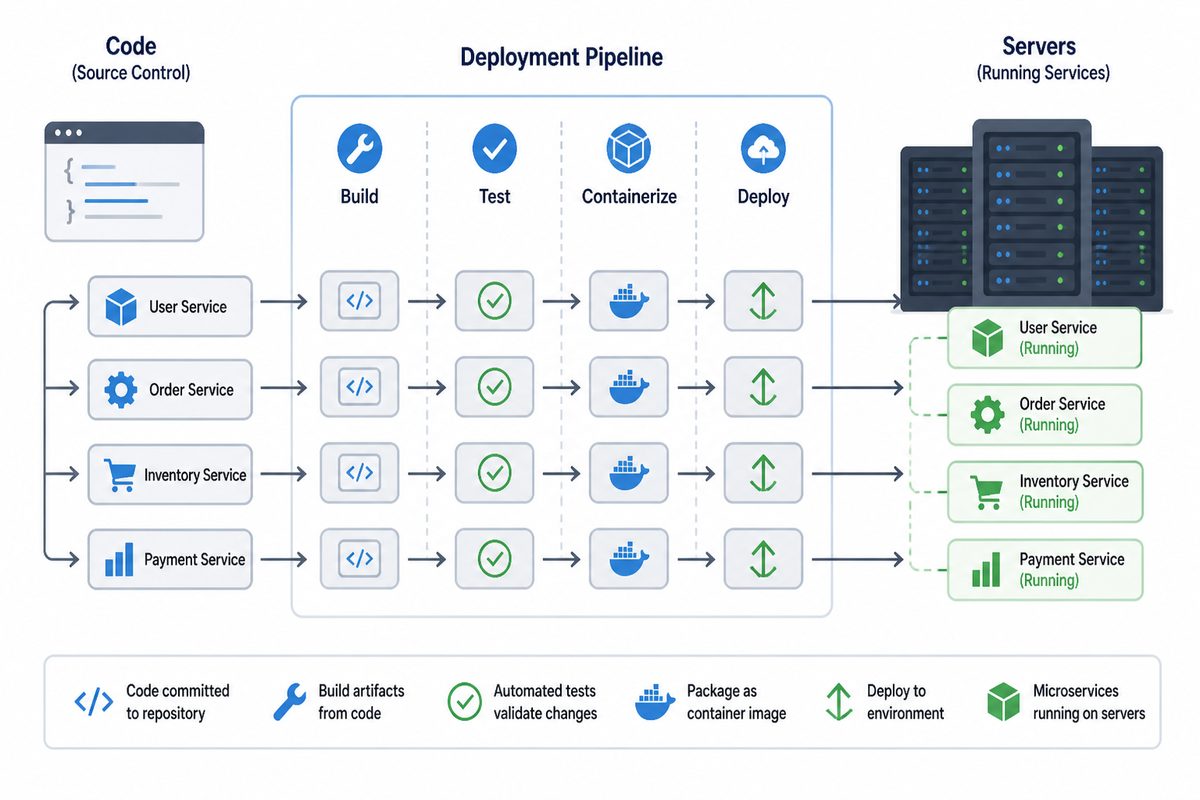
This guide covers deploying go-micro services to a Linux server using systemd.
Overview
go-micro provides a clear workflow from development to production:
| Stage | Command | Purpose |
|---|---|---|
| Develop | micro run | Local dev with hot reload and API gateway |
| Build | micro build | Compile production binaries for any target OS |
| Deploy | micro deploy | Push binaries to a remote Linux server via SSH + systemd |
| Dashboard | micro server | Optional production web UI with JWT auth and user management |
Each command has a distinct role — they don’t overlap:
micro runbuilds, runs, and watches services locally. It includes a lightweight gateway. Use it for development.micro buildcompiles binaries without running them. Use it to prepare release artifacts.micro deploysends binaries to a remote server and manages them with systemd. It builds automatically if needed.micro serverprovides an authenticated web dashboard for services that are already running. It does NOT build or run services.
Quick Start
1. Prepare Your Server
On your server (Ubuntu, Debian, or any systemd-based Linux):
# Install micro
curl -fsSL https://go-micro.dev/install.sh | sh

# Initialize for deployment
sudo micro init --server
This creates:
/opt/micro/bin/- where service binaries live/opt/micro/data/- persistent data directory/opt/micro/config/- environment files- systemd template for managing services
2. Deploy from Your Machine
# From your project directory
micro deploy user@your-server
That’s it! The deploy command:
- Builds your services for Linux
- Copies binaries to the server
- Configures and starts systemd services
- Verifies everything is running
Detailed Setup
Server Requirements
- Linux with systemd (Ubuntu 16.04+, Debian 8+, CentOS 7+, etc.)
- SSH access
- Go installed (only if building on server)
Server Initialization Options
# Basic setup (creates 'micro' user)
sudo micro init --server

# Custom installation path
sudo micro init --server --path /home/deploy/micro

# Run services as existing user
sudo micro init --server --user deploy

# Initialize remotely (from your laptop)
micro init --server --remote user@your-server
What Gets Created
Directories:
/opt/micro/
├── bin/      # Service binaries
├── data/     # Persistent data (databases, files)
└── config/   # Environment files (*.env)
Systemd Template (/etc/systemd/system/micro@.service):
[Unit]
Description=Micro service: %i
After=network.target

[Service]
Type=simple
User=micro
WorkingDirectory=/opt/micro
ExecStart=/opt/micro/bin/%i
Restart=on-failure
RestartSec=5
EnvironmentFile=-/opt/micro/config/%i.env

[Install]
WantedBy=multi-user.target
The %i is replaced with the service name. So micro@users.service runs /opt/micro/bin/users.
Deployment
Basic Deploy
micro deploy user@server
Deploy Specific Service
micro deploy user@server --service users
Force Rebuild
micro deploy user@server --build
Named Deploy Targets
Add to your micro.mu:
service users
    path ./users
    port 8081

service web
    path ./web
    port 8080

deploy prod
    ssh deploy@prod.example.com

deploy staging
    ssh deploy@staging.example.com
Then:
micro deploy prod      # deploys to prod.example.com
micro deploy staging   # deploys to staging.example.com
Managing Services
Check Status
# Local services
micro status

# Remote services
micro status --remote user@server
Output:
server.example.com
━━━━━━━━━━━━━━━━━━━━━━━━━━━━━━━━━━━━━━━━━━━━

  users    ● running    pid 1234
  posts    ● running    pid 1235
  web      ● running    pid 1236
View Logs
# All services
micro logs --remote user@server

# Specific service
micro logs users --remote user@server

# Follow logs
micro logs users --remote user@server -f
Stop Services
micro stop users --remote user@server
Direct systemctl Access
You can also manage services directly on the server:
# Status
sudo systemctl status micro@users

# Restart
sudo systemctl restart micro@users

# Stop
sudo systemctl stop micro@users

# Logs
journalctl -u micro@users -f
Environment Variables
Create environment files at /opt/micro/config/<service>.env:
# /opt/micro/config/users.env
DATABASE_URL=postgres://localhost/users
REDIS_URL=redis://localhost:6379
LOG_LEVEL=info
These are automatically loaded by systemd when the service starts.
SSH Setup
Key-Based Authentication
# Generate key (if you don't have one)
ssh-keygen -t ed25519

# Copy to server
ssh-copy-id user@server
SSH Config
Add to ~/.ssh/config:
Host prod
    HostName prod.example.com
    User deploy
    IdentityFile ~/.ssh/deploy_key

Host staging
    HostName staging.example.com
    User deploy
    IdentityFile ~/.ssh/deploy_key
Then deploy with:
micro deploy prod
Troubleshooting
“Cannot connect to server”
✗ Cannot connect to myserver

  SSH connection failed. Check that:
  • The server is reachable: ping myserver
  • SSH is configured: ssh user@myserver
  • Your key is added: ssh-add -l
Fix:
# Test SSH connection
ssh user@server

# Add SSH key
ssh-copy-id user@server

# Check SSH agent
eval $(ssh-agent)
ssh-add
“Server not initialized”
✗ Server not initialized

  micro is not set up on myserver.
Fix:
ssh user@server 'sudo micro init --server'
“Service failed to start”
Check the logs:
micro logs myservice --remote user@server

# Or on the server:
journalctl -u micro@myservice -n 50
Common causes:
- Missing environment variables
- Port already in use
- Database not reachable
- Binary permissions issue
“Permission denied”
Ensure your user can write to /opt/micro/bin/:
# On server
sudo chown -R deploy:deploy /opt/micro

# Or add user to micro group
sudo usermod -aG micro deploy
Security Best Practices
- Use a dedicated deploy user - Don’t deploy as root
- Use SSH keys - Disable password authentication
- Restrict sudo - Only allow necessary commands
- Firewall - Only expose needed ports
- Secrets - Use environment files with restricted permissions (0600)
Minimal sudo access
Add to /etc/sudoers.d/micro:
deploy ALL=(ALL) NOPASSWD: /bin/systemctl daemon-reload
deploy ALL=(ALL) NOPASSWD: /bin/systemctl enable micro@*
deploy ALL=(ALL) NOPASSWD: /bin/systemctl restart micro@*
deploy ALL=(ALL) NOPASSWD: /bin/systemctl stop micro@*
deploy ALL=(ALL) NOPASSWD: /bin/systemctl status micro@*
Production Dashboard (Optional)
Once services are deployed and managed by systemd, you can optionally run micro server on the same machine to get a full web dashboard with authentication:
# On your server
micro server
This gives you:
- Web Dashboard at http://your-server:8080 with JWT authentication
- API Gateway with authenticated HTTP-to-RPC proxy
- User Management — create accounts, generate/revoke API tokens
- Logs & Status — view service logs and uptime from the browser
The server discovers services via the registry automatically. Default login: admin / micro.
See the micro server documentation for details.
Next Steps
- micro run - Local development
- micro server - Production web dashboard with auth
- micro.mu configuration - Configuration file format
- Health checks - Service health endpoints
5 - Architecture
An overview of the Go Micro architecture.
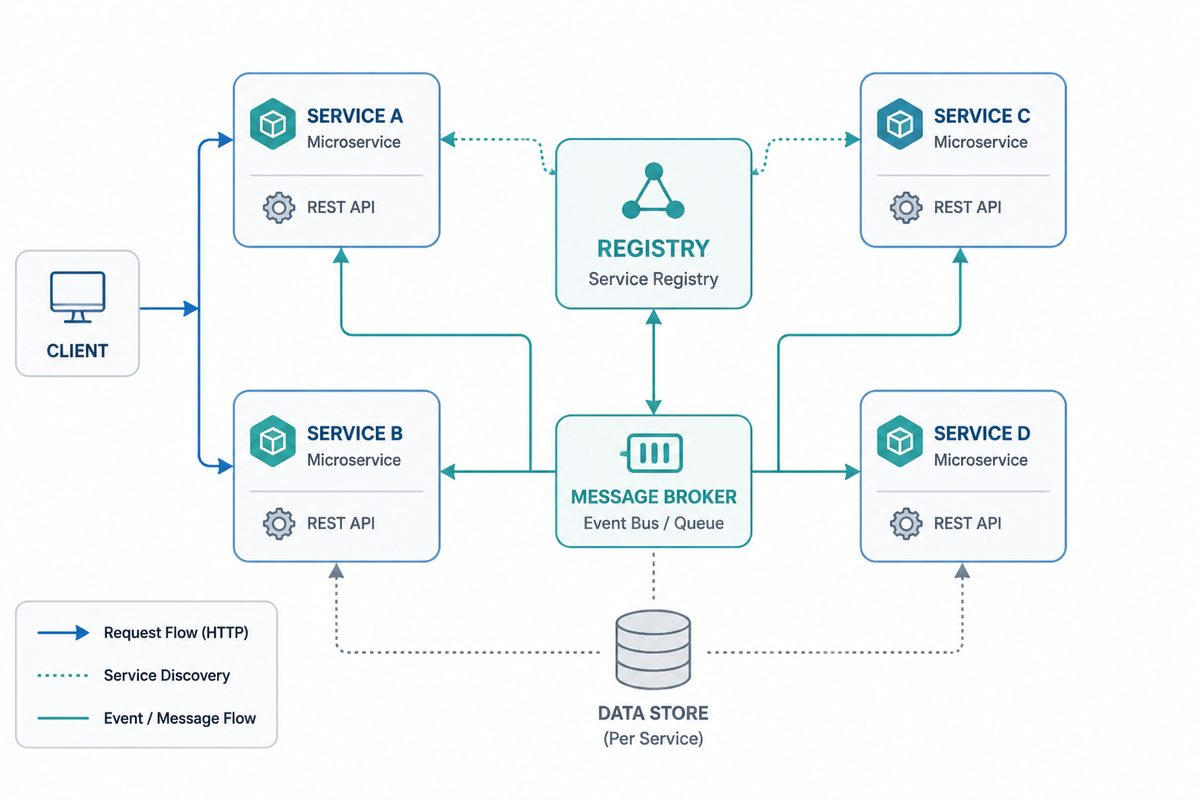
An overview of the Go Micro architecture.
Overview
Go Micro abstracts away the details of distributed systems. Here are the main features.
Authentication - Auth is built in as a first class citizen. Authentication and authorization enable secure zero trust networking by providing every service an identity and certificates. This additionally includes rule based access control.
Dynamic Config - Load and hot reload dynamic config from anywhere. The config interface provides a way to load application level config from any source such as env vars, file, etcd. You can merge the sources and even define fallbacks.
Data Storage - A simple data store interface to read, write and delete records. It includes support for many storage backends in the plugins repo. State and persistence becomes a core requirement beyond prototyping and Micro looks to build that into the framework.
Service Discovery - Automatic service registration and name resolution. Service discovery is at the core of micro service development. When service A needs to speak to service B it needs the location of that service. The default discovery mechanism is multicast DNS (mdns), a zeroconf system.
Load Balancing - Client side load balancing built on service discovery. Once we have the addresses of any number of instances of a service we now need a way to decide which node to route to. We use random hashed load balancing to provide even distribution across the services and retry a different node if there’s a problem.
Message Encoding - Dynamic message encoding based on content-type. The client and server will use codecs along with content-type to seamlessly encode and decode Go types for you. Any variety of messages could be encoded and sent from different clients. The client and server handle this by default. This includes protobuf and json by default.
RPC Client/Server - RPC based request/response with support for bidirectional streaming. We provide an abstraction for synchronous communication. A request made to a service will be automatically resolved, load balanced, dialled and streamed.
Async Messaging - PubSub is built in as a first class citizen for asynchronous communication and event driven architectures. Event notifications are a core pattern in micro service development. The default messaging system is a HTTP event message broker.
Pluggable Interfaces - Go Micro makes use of Go interfaces for each distributed system abstraction. Because of this these interfaces are pluggable and allows Go Micro to be runtime agnostic. You can plugin any underlying technology.
Design
We will share more on architecture soon
Related
Example Usage
Here’s a minimal Go Micro service demonstrating the architecture:
package main

import (
    "go-micro.dev/v6"
    "log"
)

func main() {
    service := micro.NewService("example",
    )
    service.Init()
    if err := service.Run(); err != nil {
        log.Fatal(err)
    }
}
6 - Configuration
Go Micro follows a progressive configuration model so you can start with zero setup and layer in complexity only when needed.
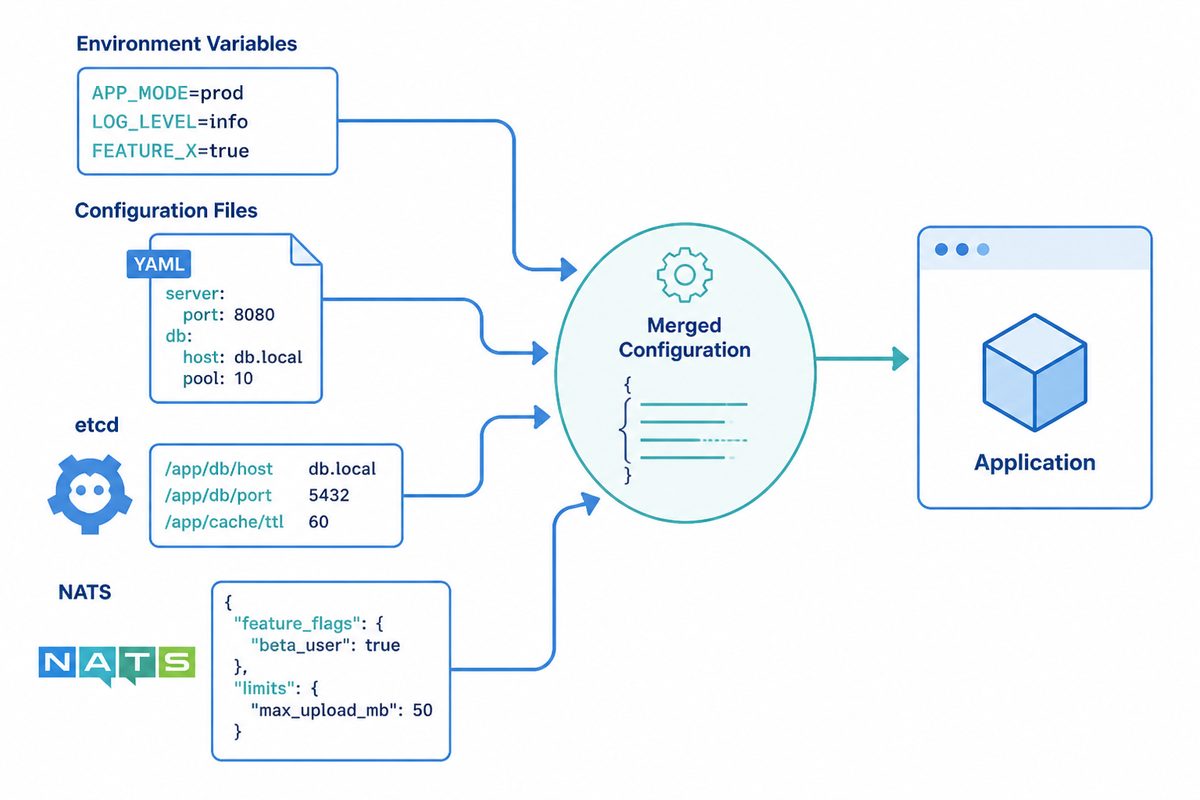
Go Micro follows a progressive configuration model so you can start with zero setup and layer in complexity only when needed.
Levels of Configuration
- Zero Config (Defaults)
- mDNS registry, HTTP transport, in-memory broker/store
- Environment Variables
- Override core components without code changes
- Code Options
- Fine-grained control via functional options
- External Sources (Future / Plugins)
- Configuration loaded from files, vaults, or remote services
Core Environment Variables
| Component | Variable | Example | Purpose |
|---|---|---|---|
| Registry | MICRO_REGISTRY | MICRO_REGISTRY=consul | Select registry implementation |
| Registry Address | MICRO_REGISTRY_ADDRESS | MICRO_REGISTRY_ADDRESS=127.0.0.1:8500 | Point to registry service |
| Broker | MICRO_BROKER | MICRO_BROKER=nats | Select broker implementation |
| Broker Address | MICRO_BROKER_ADDRESS | MICRO_BROKER_ADDRESS=nats://localhost:4222 | Broker endpoint |
| Transport | MICRO_TRANSPORT | MICRO_TRANSPORT=nats | Select transport implementation |
| Transport Address | MICRO_TRANSPORT_ADDRESS | MICRO_TRANSPORT_ADDRESS=nats://localhost:4222 | Transport endpoint |
| Store | MICRO_STORE | MICRO_STORE=postgres | Select store implementation |
| Store Database | MICRO_STORE_DATABASE | MICRO_STORE_DATABASE=app | Logical database name |
| Store Table | MICRO_STORE_TABLE | MICRO_STORE_TABLE=records | Default table/collection |
| Store Address | MICRO_STORE_ADDRESS | MICRO_STORE_ADDRESS=postgres://user:pass@localhost:5432/app?sslmode=disable | Connection string |
| Server Address | MICRO_SERVER_ADDRESS | MICRO_SERVER_ADDRESS=:8080 | Bind address for RPC server |
Example: Switching Components via Env Vars
# Use NATS for broker and transport, Consul for registry
export MICRO_BROKER=nats
export MICRO_TRANSPORT=nats
export MICRO_REGISTRY=consul
export MICRO_REGISTRY_ADDRESS=127.0.0.1:8500

# Run your service
go run main.go
No code changes required. The framework internally wires the selected implementations.
Equivalent Code Configuration
service := micro.NewService("helloworld",
    micro.Broker(nats.NewBroker()),
    micro.Transport(natstransport.NewTransport()),
    micro.Registry(consul.NewRegistry(registry.Addrs("127.0.0.1:8500"))),
)
service.Init()
Use env vars for deployment level overrides; use code options for explicit control or when composing advanced setups.
Precedence Rules
- Explicit code options always win
- If not set in code, env vars are applied
- If neither code nor env vars set, defaults are used
Discoverability Strategy
Defaults allow local development with zero friction. As teams scale:
- Introduce env vars for staging/production parity
- Consolidate secrets (e.g. store passwords) using external secret managers (future guide)
- Move to service mesh aware registry (Consul/NATS JetStream)
Validating Configuration
Enable debug logging to confirm selected components:
MICRO_LOG_LEVEL=debug go run main.go
You will see lines like:
Registry [consul] Initialised
Broker [nats] Connected
Transport [nats] Listening on nats://localhost:4222
Store [postgres] Connected to app/records
Patterns
Twelve-Factor Alignment
Environment variables map directly to deploy-time configuration. Avoid hardcoding component choices so services remain portable.
Multi-Environment Setup
Use a simple env file per environment:
# .env.staging
MICRO_REGISTRY=consul
MICRO_REGISTRY_ADDRESS=consul.staging.internal:8500
MICRO_BROKER=nats
MICRO_BROKER_ADDRESS=nats.staging.internal:4222
MICRO_STORE=postgres
MICRO_STORE_ADDRESS=postgres://staging:pass@pg.staging.internal:5432/app?sslmode=disable
Load with your process manager or container orchestrator.
Troubleshooting
| Symptom | Cause | Fix |
|---|---|---|
| Service starts with memory store unexpectedly | Env vars not exported | `env |
| Consul errors about connection refused | Wrong address/port | Check MICRO_REGISTRY_ADDRESS value |
| NATS connection timeout | Server not running | Start NATS or change address |
| Postgres SSL errors | Missing sslmode param | Append ?sslmode=disable locally |
Related
7 - Observability
Observability in Go Micro spans logs, metrics, and traces. The goal is rapid insight into service behavior with minimal configuration.
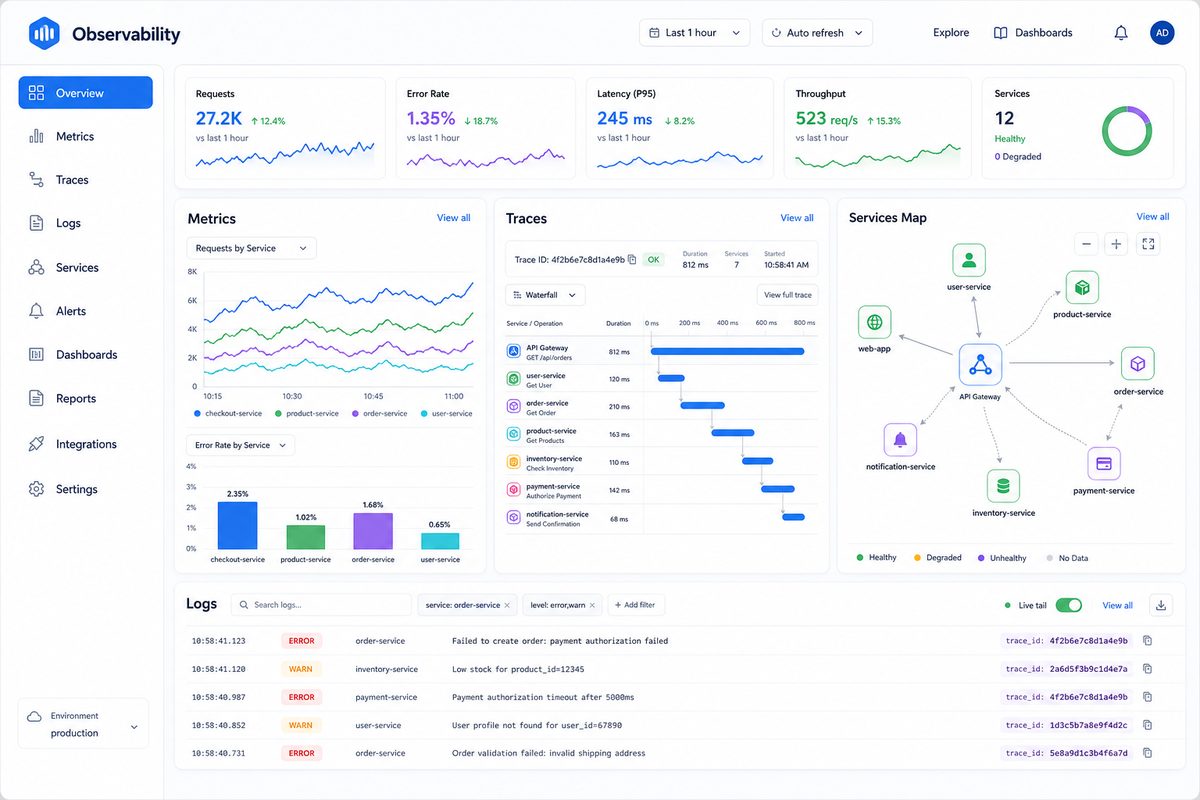
Observability in Go Micro spans logs, metrics, and traces. The goal is rapid insight into service behavior with minimal configuration.
Core Principles
- Structured Logs – Machine-parsable, leveled output
- Metrics – Quantitative trends (counters, gauges, histograms)
- Traces – Request flows across service boundaries
- Correlation – IDs flowing through all three signals
Logging
The default logger can be replaced. Use env vars to adjust level:
MICRO_LOG_LEVEL=debug go run main.go
Recommended fields:
service– service nameversion– release identifiertrace_id– propagated context idspan_id– current operation id
Metrics
Patterns:
- Emit counters for request totals
- Use histograms for latency
- Track error rates per endpoint
Example (pseudo-code):
// Wrap handler to record metrics
func MetricsWrapper(fn micro.HandlerFunc) micro.HandlerFunc {
    return func(ctx context.Context, req micro.Request, rsp interface{}) error {
        start := time.Now()
        err := fn(ctx, req, rsp)
        latency := time.Since(start)
        metrics.Inc("requests_total", req.Endpoint(), errorLabel(err))
        metrics.Observe("request_latency_seconds", latency, req.Endpoint())
        return err
    }
}
Tracing
Distributed tracing links calls across services.
Propagation strategy:
- Extract trace context from incoming headers
- Inject into outgoing RPC calls/broker messages
- Create spans per handler and client call
Local Development Strategy
Start with only structured logs. Add metrics when operating multiple services. Introduce tracing once debugging multi-hop latency or failures.
Roadmap (Planned Enhancements)
- Native OpenTelemetry exporter helpers
- Automatic handler/client wrapping for spans
- Default correlation IDs across broker messages
Deployment Recommendations
| Scale | Suggested Stack |
|---|---|
| Dev | Console logs only |
| Staging | Logs + basic metrics (Prometheus) |
| Prod (basic) | Logs + metrics + sampling traces |
| Prod (complex) | Full tracing + profiling + anomaly detection |
Troubleshooting
| Symptom | Cause | Fix |
|---|---|---|
| Missing trace IDs in logs | Context not propagated | Ensure wrappers add IDs |
| Metrics server empty | Endpoint not scraped | Verify Prometheus config |
| High cardinality metrics | Dynamic labels | Reduce labeled dimensions |
Related
8 - Hosting Go Micro Services
This document outlines what hosting looks like for go-micro services, the options available today, and what an ideal hosting platform would provide.
Go Micro services are compiled Go binaries that communicate via RPC and event-driven messaging. Hosting them requires infrastructure that supports service discovery, inter-service communication, persistent storage, and configuration management. Because go-micro uses a pluggable architecture, the hosting environment can range from a single VPS to a fully orchestrated cluster.
Current Hosting Options
Single VPS or Bare Metal
The simplest approach. Deploy compiled binaries to a Linux server and manage them with systemd. This is the model described in the Deployment Guide.
Good for: Small teams, early-stage projects, predictable workloads.
Server
├── micro@users.service
├── micro@posts.service
├── micro@web.service
└── mdns for discovery
- Use
micro deployto push binaries over SSH - systemd handles process supervision and restarts
- mDNS provides zero-configuration service discovery on the local host
- Environment files supply per-service configuration
Multiple Servers
Run services across several machines. This requires replacing mDNS with a network-aware registry like Consul or Etcd so services can discover each other across hosts.
# Point all services at a shared registry
MICRO_REGISTRY=consul MICRO_REGISTRY_ADDRESS=consul.internal:8500
- Deploy with
micro deployto each target server - Use a central registry (Consul, Etcd, or NATS) for cross-host discovery
- Place a load balancer or API gateway in front of public-facing services
Containers and Kubernetes
Package each service as a Docker image and deploy to a Kubernetes cluster or a simpler container runtime like Docker Compose.
Dockerfile example:
FROM golang:1.21-alpine AS build
WORKDIR /app
COPY . .
RUN go build -o service ./cmd/service

FROM alpine:3.19
COPY --from=build /app/service /service
ENTRYPOINT ["/service"]
Kubernetes considerations:
- Use the Kubernetes registry plugin or run Consul/Etcd as a StatefulSet
- ConfigMaps and Secrets replace environment files
- Kubernetes Services and Ingress handle external traffic
- Horizontal Pod Autoscaler manages scaling
- Liveness and readiness probes map to go-micro health checks
Platform as a Service (PaaS)
Deploy to managed platforms like Railway, Render, or Fly.io. Each service runs as a separate application.
- Configuration via platform-provided environment variables
- Managed TLS and load balancing out of the box
- Use NATS or a hosted registry for service discovery between apps
- Limited control over networking and co-location
What a Hosting Platform Needs
A purpose-built platform for go-micro services would integrate with the framework’s core abstractions rather than treating services as generic containers.
Service Discovery
The platform must run or integrate with a supported registry so services find each other automatically.
| Environment | Recommended Registry |
|---|---|
| Single host | mDNS (default, zero config) |
| Multi-host / cloud | Consul, Etcd, or NATS |
| Kubernetes | Kubernetes registry plugin |
RPC and Messaging
Services communicate over RPC (request/response) and asynchronous messaging (pub/sub). The platform must allow direct service-to-service communication on the configured transport.
- Transport: HTTP (default), gRPC, or NATS
- Broker: HTTP event broker (default), NATS, or RabbitMQ
- Internal traffic should stay on a private network
- External traffic flows through a gateway or load balancer
Configuration Management
Each service loads configuration from environment variables, files, or remote sources. The platform should provide:
- Per-service environment variables or config files
- Secret management with restricted access
- Hot-reload support for dynamic configuration changes
Data Storage
go-micro’s store interface supports multiple backends. The platform should provide or connect to durable storage.
- Development: In-memory store (default)
- Production: Postgres, MySQL, Redis, or other supported backends
- Persistent volumes or managed database services for stateful data
Health Checks and Observability
The platform should monitor service health and provide visibility into behavior.
- Health endpoints for liveness and readiness
- Structured logs collected and searchable
- Metrics (request rates, latencies, error rates) scraped or pushed
- Distributed tracing across service boundaries
See Observability for details on logs, metrics, and traces.
Security
- TLS for all inter-service communication
- Service-level authentication and authorization via go-micro’s auth interface
- Network isolation between services and the public internet
- Secret rotation and audit logging
Scaling
- Horizontal scaling: run multiple instances of a service behind the client-side load balancer
- The registry tracks all instances; the selector distributes requests
- Auto-scaling based on resource usage or request volume
Ideal Platform Architecture
A hosting platform tailored for go-micro would look like this:
                    ┌──────────────┐
    Internet ──────▶│   Gateway    │
                    └──────┬───────┘
                           │
              ┌────────────┼────────────┐
              │            │            │
        ┌─────▼────┐ ┌────▼─────┐ ┌───▼──────┐
        │ Service A │ │ Service B│ │ Service C │
        │ (n inst.) │ │ (n inst.)│ │ (n inst.) │
        └─────┬────┘ └────┬─────┘ └───┬──────┘
              │            │            │
    ┌─────────▼────────────▼────────────▼─────────┐
    │              Private Network                 │
    │  ┌──────────┐  ┌───────┐  ┌──────────────┐  │
    │  │ Registry │  │ Broker│  │   Store      │  │
    │  │(Consul/  │  │(NATS/ │  │(Postgres/    │  │
    │  │ Etcd)    │  │ Redis)│  │ MySQL/Redis) │  │
    │  └──────────┘  └───────┘  └──────────────┘  │
    └─────────────────────────────────────────────┘
Platform Capabilities
- Deploy — Push binaries or container images; the platform registers them with the registry
- Discover — Built-in registry so services find each other without manual configuration
- Route — Gateway for external traffic; direct RPC for internal traffic
- Scale — Add or remove instances; the registry and selector handle rebalancing
- Configure — Environment variables, secrets, and dynamic config per service
- Observe — Centralized logs, metrics dashboards, and trace visualization
- Secure — Automatic TLS, service identity, and network policies
Deployment Workflow
Developer                        Platform
────────                        ────────
micro build           ─────▶   Receive binary/image
micro deploy prod     ─────▶   Place on compute
                               Register with discovery
                               Start health checks
                               Route traffic
Choosing a Hosting Strategy
| Factor | Single VPS | Multi-Server | Kubernetes | PaaS |
|---|---|---|---|---|
| Complexity | Low | Medium | High | Low |
| Cost | Low | Medium | High | Variable |
| Scaling | Manual | Manual | Automatic | Automatic |
| Service discovery | mDNS | Consul/Etcd/NATS | Plugin or Consul | External |
| Ops overhead | Minimal | Moderate | Significant | Minimal |
| Best for | Prototypes, small apps | Growing teams | Large-scale production | Quick launches |
Getting Started
- Start simple — Deploy to a single server with
micro deployand mDNS - Add a registry — When you need multiple servers, switch to Consul or Etcd
- Containerize — When you need reproducible environments, add Docker
- Orchestrate — When you need auto-scaling and self-healing, move to Kubernetes or a PaaS
Related
- Deployment — Deploy services to a Linux server with systemd
- Registry — Service discovery backends
- Architecture — Go Micro design and components
- Observability — Logs, metrics, and tracing
- Performance — Performance characteristics and tuning
9 - Performance Considerations
go-micro is designed for developer productivity and ease of use while maintaining good performance for most use cases. This document explains the performance characteristics and trade-offs.
Reflection Usage
go-micro uses Go’s reflection package to enable its core feature: registering any Go struct as a service handler without code generation or boilerplate.
Why Reflection?
// Simple handler registration - no proto files, no code generation
type GreeterService struct{}

func (g *GreeterService) SayHello(ctx context.Context, req *Request, rsp *Response) error {
    rsp.Message = "Hello " + req.Name
    return nil
}

server.Handle(server.NewHandler(&GreeterService{}))
This simplicity is only possible with reflection. Alternative approaches (like gRPC or psrpc) require:
- Writing
.protofiles - Running code generators
- Implementing generated interfaces
- Managing generated code in version control
Performance Impact
Reflection adds approximately 40-60 microseconds (0.04-0.06ms) overhead per RPC call for:
- Method discovery and validation (~5μs)
- Dynamic method invocation (~30-40μs)
- Request/response type construction (~10-15μs)
This totals ~50μs on average, though the exact overhead depends on the complexity of the handler signature and request/response types.
Context: In typical RPC scenarios:
| Component | Typical Time |
|---|---|
| Network I/O | 1-10ms |
| Protobuf serialization | 0.1-0.5ms |
| Business logic | Variable (often 1-100ms+) |
| Reflection + framework overhead | ~0.06ms (0.6-6% of total) |
When Reflection Matters
Reflection overhead is only significant when ALL of these conditions are true:
- ✅ Request rate >100,000 RPS
- ✅ Business logic <100μs
- ✅ Local/loopback communication
- ✅ Sub-millisecond latency requirements
For 99% of applications, database queries, external services, and business logic dominate performance. Reflection is negligible.
Performance Best Practices
1. Profile Before Optimizing
Always measure before assuming reflection is your bottleneck:
# Enable pprof in your service
import _ "net/http/pprof"

# Profile CPU usage
go tool pprof http://localhost:6060/debug/pprof/profile?seconds=30
If reflection shows up as <5% of CPU time, optimizing elsewhere will have more impact.
2. Optimize Business Logic First
Common optimization opportunities (typically 10-100x more impact than removing reflection):
- Database queries: Use connection pooling, indexes, query optimization
- External API calls: Use caching, batching, async processing
- Serialization: Use efficient protobuf instead of JSON
- Concurrency: Use goroutines and channels effectively
3. Use Appropriate Transports
go-micro supports multiple transports:
- HTTP: Good for debugging, ~1-2ms overhead
- gRPC: Binary protocol, ~0.2-0.5ms overhead
- In-memory: Development/testing, <0.1ms overhead
Choose based on your deployment:
import "go-micro.dev/v5/server/grpc"

// Use gRPC for better performance
service := micro.NewService(
    micro.Server(grpc.NewServer()),
)
4. Enable Connection Pooling
Reuse connections to avoid handshake overhead:
// Client-side connection pooling (enabled by default)
client := service.Client()
5. Use Appropriate Codecs
go-micro supports multiple codecs:
// Protobuf (fastest, binary)
import "go-micro.dev/v5/codec/proto"

// JSON (human-readable, slower)
import "go-micro.dev/v5/codec/json"

// MessagePack (compact, fast)
import "go-micro.dev/v5/codec/msgpack"
Protobuf is 2-5x faster than JSON for most payloads.
When to Consider Alternatives
If you’ve profiled and determined reflection is genuinely a bottleneck (rare), consider:
gRPC
Pros:
- No reflection overhead (uses code generation)
- Industry standard
- Excellent tooling
Cons:
- Requires
.protofiles - More boilerplate
- Less flexible
Use when: You need absolute maximum performance and can invest in proto definitions.
psrpc (livekit)
Pros:
- No reflection
- Built on pub/sub
- Good for distributed systems
Cons:
- Requires proto files
- Smaller ecosystem
- Different architecture
Use when: You’re building LiveKit-style distributed systems and need pub/sub primitives.
go-micro (Current)
Pros:
- Zero boilerplate
- Pure Go
- Rapid development
- Flexible
Cons:
- ~50μs reflection overhead per call
- Not suitable for <100μs latency requirements
Use when: Developer productivity and code simplicity matter more than squeezing every microsecond.
Benchmarks
Synthetic benchmarks (single request/response, no business logic):
| Framework | Latency (p50) | Throughput | Notes |
|---|---|---|---|
| Direct function call | ~1μs | 1M+ RPS | No serialization, no networking |
| go-micro (reflection) | ~60μs | ~16k RPS | ~50μs reflection + ~10μs framework |
| gRPC (generated code) | ~40μs | ~25k RPS | ~10μs codegen + ~30μs framework |
Real-world (with database, business logic):
| Scenario | go-micro | gRPC | Difference |
|---|---|---|---|
| REST API + DB | 15ms | 14.95ms | 0.3% |
| Microservice call | 5ms | 4.95ms | 1% |
| Batch processing | 100ms | 100ms | 0% |
Reflection overhead is lost in the noise for realistic workloads.
Future Optimizations
Possible future improvements (without removing reflection):
- Method cache warming: Pre-compute reflection metadata at startup
- Call argument pooling: Reuse
reflect.Valueslices - JIT optimization: Generate specialized handlers for hot paths
These could reduce reflection overhead by 50-70% while maintaining the simple API.
Summary
- Reflection is a deliberate design choice that enables go-micro’s simplicity
- Overhead is negligible (<5%) for typical microservices
- Optimize business logic first - usually 10-100x more impact
- Profile before optimizing - measure, don’t guess
- Consider alternatives only if profiling proves reflection is a bottleneck
For most applications, go-micro’s productivity benefits far outweigh the minimal reflection overhead.
Related Documents
- Reflection Removal Analysis - Detailed technical analysis
- Architecture - go-micro design principles
- Comparison with gRPC - When to use each
References
- Go Reflection Laws - Official Go blog
- Effective Go - Go best practices
- gRPC Performance Best Practices